
3D Print Warping After a Good First Layer? Causes & Fixes
Your first layer can look perfect and the print can still warp twenty, fifty or two hundred layers later.
That catches people off guard because first-layer adhesion gets blamed for almost every lifted corner. If the part was flat and firmly attached when the print started, it is tempting to assume the bed surface did its job and something mysterious happened later.
Usually, nothing mysterious happened.
The plastic simply cooled, contracted and pulled hard enough on the lower layers to overcome the bond between the part and the build plate.
That distinction matters because the fix for “the first layer never stuck” is not always the fix for “the first layer stuck perfectly and the corner lifted an hour later.”
Warping is a temperature problem before it is an adhesion problem
Thermoplastics expand when heated and contract as they cool.
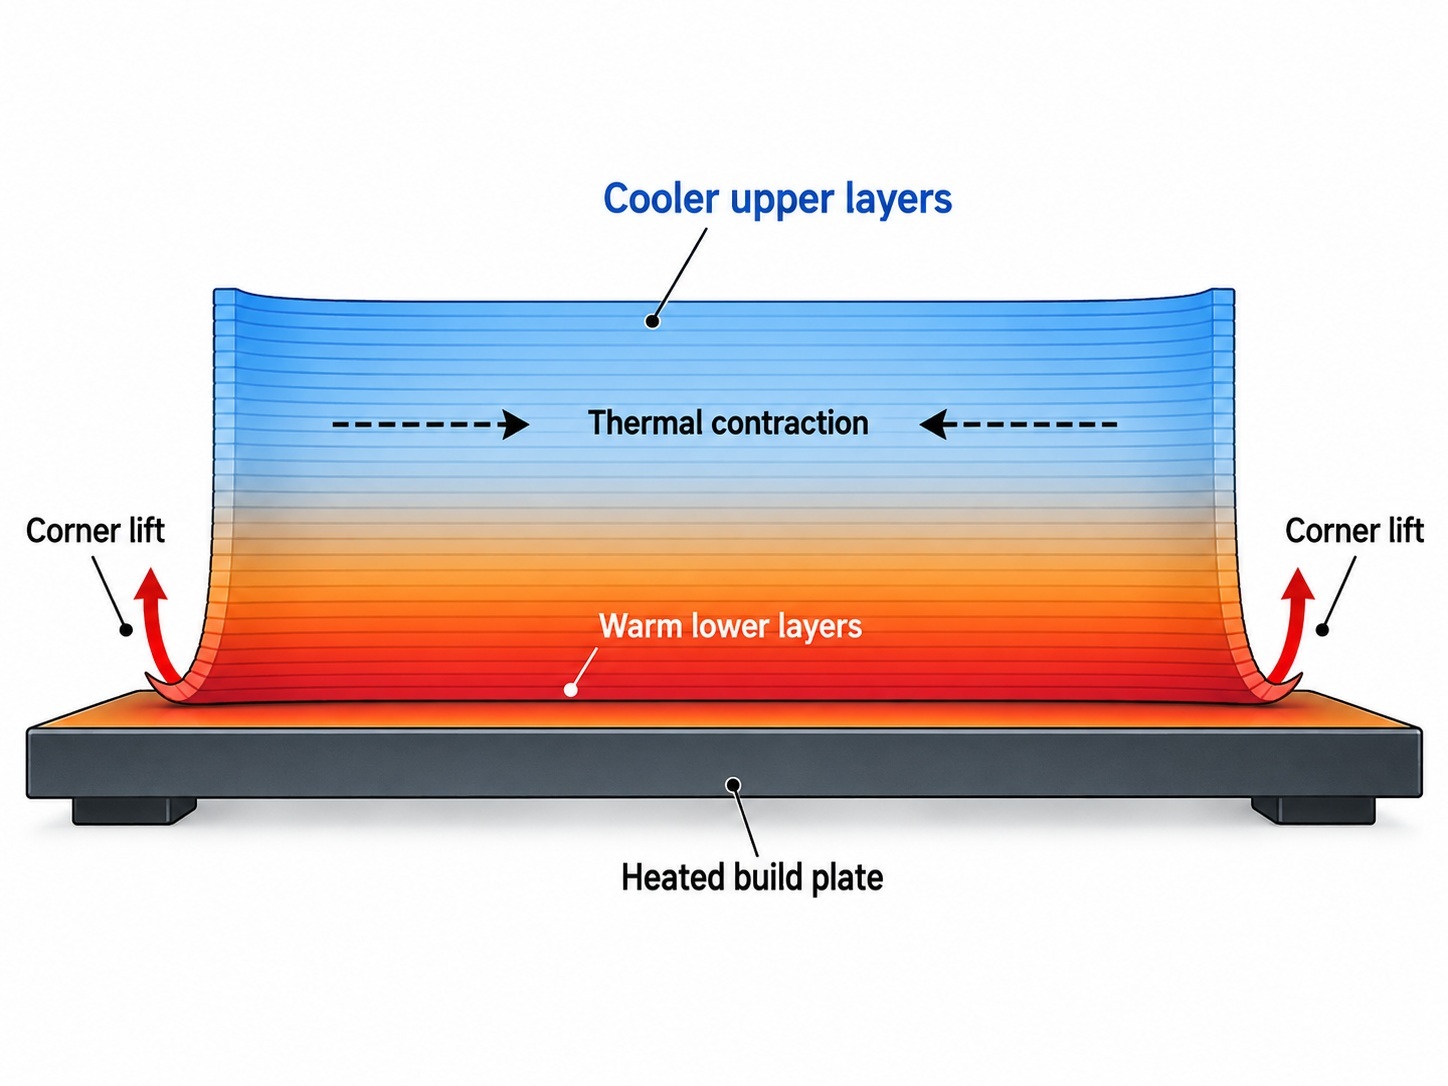
In FDM printing, new material leaves the nozzle hot and is deposited onto material that is already cooler. As the part grows, different areas of the print can be at noticeably different temperatures.
If the upper layers cool and contract while the lower layers are still being held flat by the bed, stress builds inside the part.
The corners are particularly vulnerable because they have less surrounding material resisting that pull. Once the contraction force exceeds the grip between the first layer and the build surface, the corner starts to lift.
The important part is this:
The first layer did not necessarily fail. It may have been pulled off the plate by the rest of the print.
The material makes a huge difference
Some materials shrink much more aggressively than others as they cool.
PLA is comparatively forgiving and will often print large parts successfully in an open machine. PETG usually has manageable shrinkage as well, although large flat parts can still lift.
ABS and ASA are different.
Both materials are much more sensitive to temperature differences across the part. Spool3D's current ASA printing recommendations call for a heated bed and enclosure, and recommend a heated chamber for taller prints because the environment around the part gets cooler as the print moves farther from the bed.
That is exactly the condition that promotes warping: the bottom of the model is sitting close to a 100°C build plate while the top may be surrounded by much cooler air.
For this reason, we recommend treating ABS and ASA as enclosure materials rather than trying to solve every lifted corner with more glue.
A perfect first layer can actually hide the problem for a while
Imagine printing a large rectangular ASA enclosure.
The first layer goes down beautifully. The plate is clean, Z height is correct and the bottom surface has excellent contact.
For the first few millimetres, everything still looks fine.
Then the upper portion of the print begins cooling faster than the material near the bed. The newer layers shrink. That contraction pulls inward on the walls and upward on the corners.
At first, the build plate wins.
As more layers are added and more stress accumulates, one corner finally moves. Once the corner has lifted slightly, the geometry and temperature distribution change, and the warp can become progressively worse.
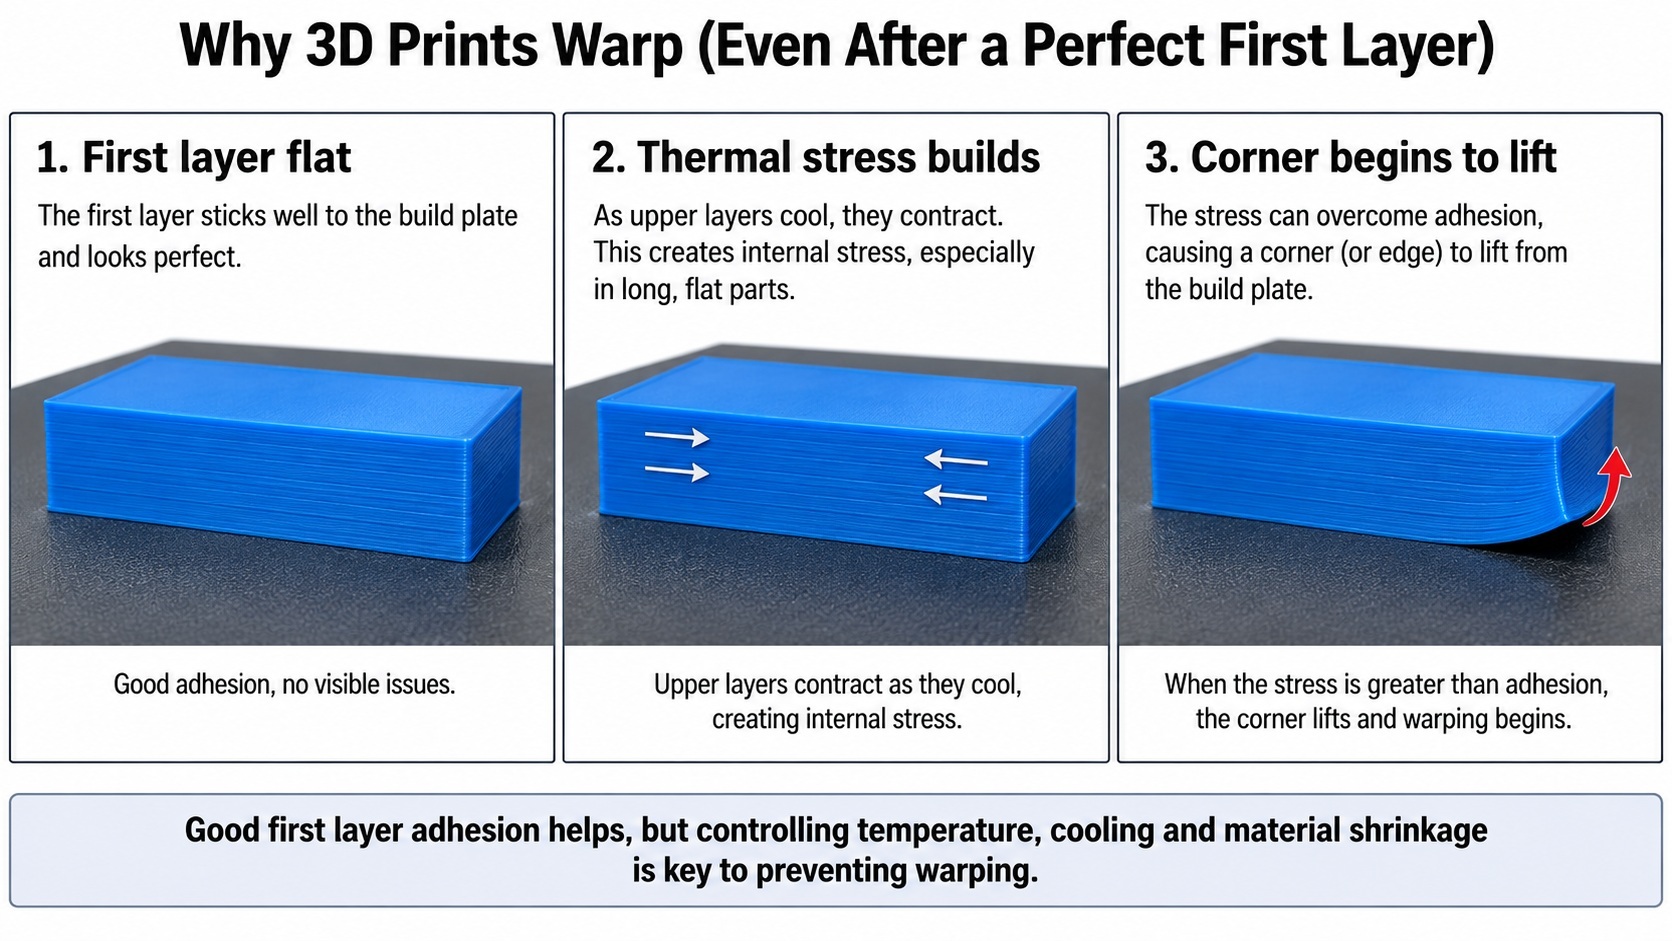
This is why inspecting only the first five minutes of a long print does not tell you whether the thermal environment is stable enough for the job.
1. Look at where the warping starts
The location of the deformation is useful diagnostic information.
One corner lifts:
Look for a local draft, uneven build-plate temperature, contamination in that area, or geometry that concentrates stress into that corner.
Every corner lifts:
The overall thermal environment, material shrinkage, bed temperature or part geometry is more likely to be involved.
The part cracks or splits higher up while the bottom remains attached:
That strongly points toward temperature gradients and interlayer stress rather than simple first-layer adhesion.
Only thin projections or overhangs curl upward:
That may be localized overheating/cooling behaviour rather than whole-part bed warping.
2. Pay attention to when it starts
If the corner lifts during the first layer, use the first-layer checklist instead.
Our article 3D Printer First Layer Not Sticking? 7 Things to Check covers plate cleaning, nozzle height, profiles and initial adhesion.
If the part stays flat for a significant portion of the print and lifts later, focus more heavily on:
- Part cooling and ambient temperature.
- Chamber temperature.
- Drafts.
- Bed temperature stability.
- Material shrinkage.
- Part geometry.
The timing helps separate an adhesion problem from a thermal-stress problem.
3. Stabilize the printer before starting the job
A bed thermistor reaching its target does not mean the entire bed, spring-steel sheet, enclosure and surrounding air have reached equilibrium.
Large aluminum beds can continue changing shape as heat spreads through them. Enclosed printers also need time for the air, frame and internal components to warm up.
Starting an ABS or ASA print the instant a 100°C bed first reaches target temperature can mean the printer is still changing thermally while the first several layers are being built.
We covered this in detail in Why You're Actually Failing Your First Layer: The Case for Heat Soaking Your 3D Printer.
For large engineering-material prints, give the machine time to stabilize before starting the final bed mesh or print.
4. Keep the chamber temperature stable
An enclosure is useful because it reduces the temperature difference between the hot printed part and the surrounding air.
It also blocks room drafts.
That does not mean the chamber needs to be as hot as possible. The goal is a stable environment appropriate for the material.
For ABS and ASA, a warm enclosure generally reduces the thermal shock that causes contraction and corner lift. This becomes more important with large parts and tall parts that move farther away from the heated bed.
A passive enclosure may be enough for modest parts. Larger engineering prints can benefit from a printer designed for actively controlled chamber temperature.
Do not apply this advice blindly to PLA. As we covered in our heat-creep article, excessive chamber temperature can create an entirely different problem with low-temperature materials.
5. Watch for drafts you would normally ignore
A printer does not need to be beside an open garage door for drafts to matter.
Air conditioning vents, a ceiling fan, an open window, a nearby exterior door or even a powerful room fan can cool one side of a large print more quickly than the other.
This is especially telling when the same corner of different prints repeatedly lifts.
If the left rear corner is always the problem, look at what is physically happening around the left rear of the machine.
An enclosure reduces this variable dramatically, which is one reason it helps ABS and ASA so much.
6. Make sure the bed temperature is appropriate — and actually stable
Bed temperature does two jobs.
It helps the first layer adhere, but it also keeps the bottom of the model warm enough to reduce the temperature difference through the lower portion of the part.
Spool3D's current temperature guide recommends approximately:
- PETG: 70–90°C bed.
- ABS: 90–110°C bed.
- ASA: 100–110°C bed.
Those are starting ranges, not universal settings. The correct temperature also depends on the build surface and the printer manufacturer's recommendations.
You can find our current material ranges in the Spool3D filament temperature guide.
If one area of a large bed runs significantly cooler than another, a large flat part can expose that problem even when small calibration prints look perfect.
7. Do not blast ABS or ASA with unnecessary part cooling
Part cooling is useful when you need to solidify bridges, overhangs and fine features.
It is also another source of rapid temperature change.
With materials such as ABS and ASA, excessive fan speed can increase thermal contraction and make whole-part warping worse. Spool3D's ASA recommendations call for low-to-medium cooling rather than automatically running the fan at PLA-style settings.
There is some nuance here: localized features can sometimes benefit from a small amount of cooling, particularly when they are staying too hot. The goal is not “fan always off.” The goal is to avoid cooling the entire part faster than necessary.
If warping appeared after importing an aggressive high-speed profile, check the fan settings rather than assuming the build plate suddenly became defective.
8. Part geometry can make a print want to warp
Some models are simply much harder to keep flat.
Long straight walls, large rectangular bases, sharp 90-degree corners and thick solid sections can accumulate a lot of shrinkage stress.
A small rounded part may print perfectly with the same material and settings that cause a 250 mm rectangular enclosure to peel itself off the bed.
This is why a successful Benchy does not prove that your ABS profile is ready for a printer-sized electronics housing.
If you control the model, design changes can help:
- Round external corners where possible.
- Avoid unnecessarily massive solid sections.
- Use ribs instead of making an entire wall extremely thick.
- Consider splitting very large parts if the application allows it.
9. A brim helps — but understand what it is doing
A brim increases the amount of material attached to the build plate around the perimeter of the part.
That gives a lifting corner more area to fight against.
For a model that is just barely warping, this can be enough.
For a model being printed in a cold, drafty environment with a high-shrinkage material, a 20 mm brim may only delay the failure.
Use a brim as part of the solution, not as a substitute for controlling the thermal environment.
10. Adhesive can help, but stronger is not always smarter
Adhesion aids absolutely have a place in 3D printing.
Spool3D Nano Polymer Adhesive, for example, is intended for materials including ABS, ASA, PLA, PETG, PC and higher-temperature polymers.
But if a large ABS part is generating enough internal stress, simply bonding it harder to the plate can move the failure somewhere else.
The part may crack, the lower layers may deform, or an extremely strong bond can even damage some build surfaces during removal.
The better approach is:
reduce the force trying to warp the part, then provide enough adhesion to resist the remaining force.
That is very different from trying to overpower poor thermal control with progressively stronger glue.
Why lowering the Z offset is usually the wrong response
If the first layer was already good, pushing it harder into the build plate is not solving the cause of later warping.
Excessive first-layer squish can create elephant's foot, make parts harder to remove, and potentially damage the build surface.
Do not lower the nozzle simply because a corner lifted an hour into the job.
First determine whether the part is contracting because of temperature differences.
A practical troubleshooting test
If you want to know whether the environment is causing the warp, avoid changing ten settings at once.
Try this:
- Clean the build plate and confirm the first layer is already correct.
- Use a known-good filament profile.
- Heat-soak the bed and enclosure before starting.
- Eliminate room drafts.
- For ABS/ASA, keep the enclosure closed and maintain a stable warm environment.
- Use conservative part cooling.
- Add a reasonable brim if the geometry needs extra help.
If that dramatically reduces the warping, you have learned much more than you would by changing Z offset, nozzle temperature, bed temperature, flow, fan speed and glue all at the same time.
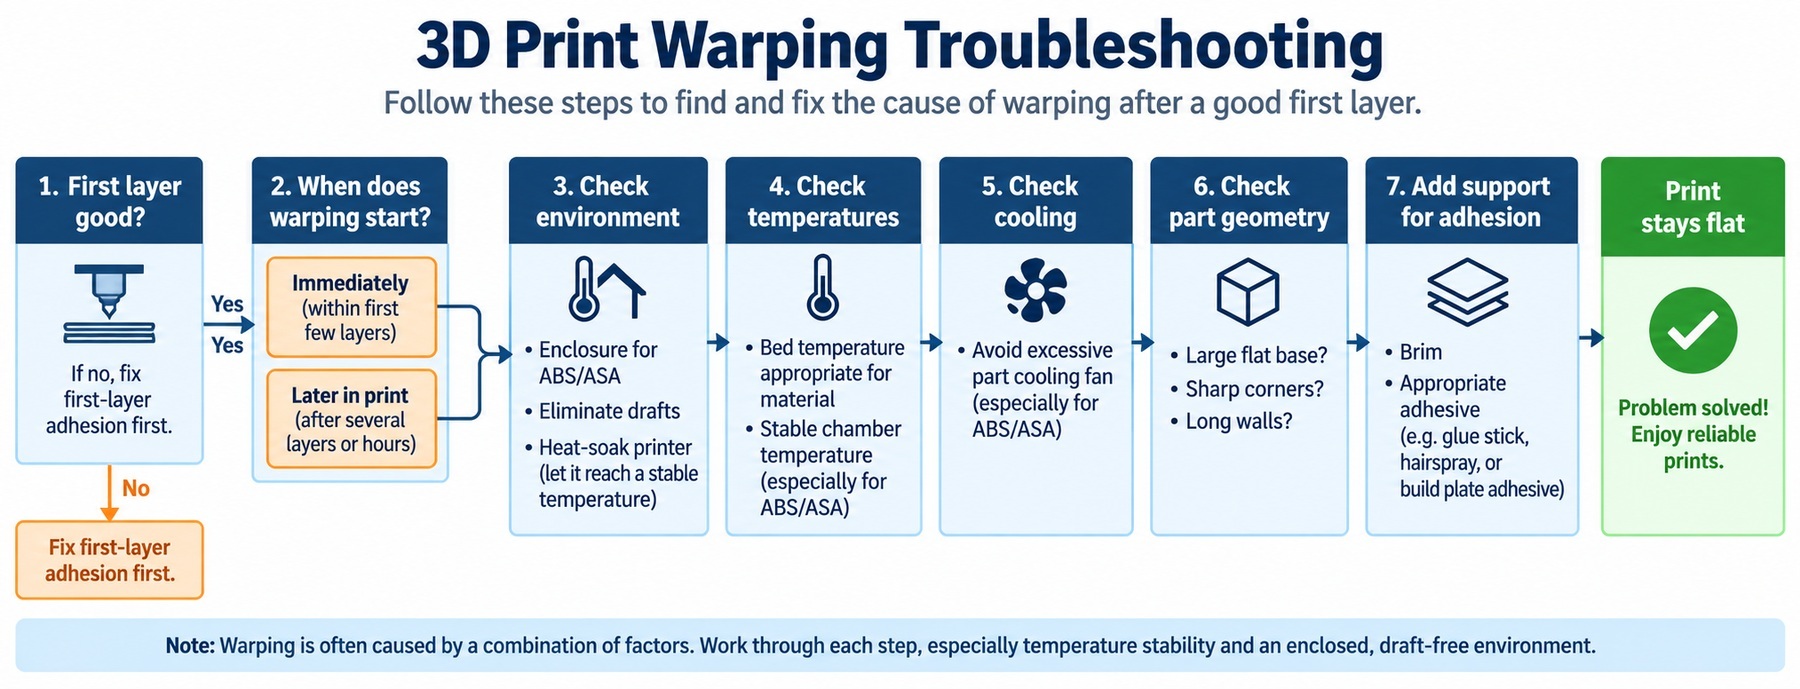
Our troubleshooting order when a good first layer warps later
- Confirm that the first layer was actually good.
- Note when and where the warp begins.
- Check whether the material normally benefits from an enclosure.
- Heat-soak the printer before starting large ABS/ASA prints.
- Eliminate drafts and large ambient-temperature changes.
- Verify bed temperature and build-surface recommendations.
- Reduce unnecessary part cooling.
- Consider whether the model geometry is concentrating shrinkage stress.
- Add a brim or suitable adhesion aid if extra holding force is still needed.
The key distinction is simple:
If the first layer never sticks, troubleshoot the first layer. If it sticks well and gets pulled upward later, troubleshoot the temperature of the entire part.
Spool3D carries 3D printer build plates and print-bed parts, Nano Polymer Adhesive, and a wide range of 3D printer filament. If a machine continues to produce inconsistent bed temperatures or mechanical problems after the printing environment has been ruled out, our 3D printer repair service in Calgary can help diagnose the printer itself.
Recent Posts
-
Fix Rough 3D Print Top Layers & Pillowing | Spool3D
The walls look good. The corners are clean. Then the printer reaches the top of the part and leave …October 14, 2026 -
3D Prints Splitting Between Layers? Causes & Fixes for Weak Layer Adhesion
A 3D print can have a smooth surface, tidy corners and a clean top layer, then split the first time …October 08, 2026 -
3D Printer Under-Extrusion: Causes, Fixes & Troubleshooting
Under-extrusion happens when your 3D printer deposits less plastic than the slicer expects. The res …October 06, 2026