
3D Printer Under-Extrusion: Causes, Fixes & Troubleshooting
Under-extrusion happens when your 3D printer deposits less plastic than the slicer expects.
The result may be obvious: missing lines, gaps between walls, weak infill, or entire sections that barely print. Other times, the print looks reasonably good until you hold it up to the light or discover how easily it breaks.
The difficult part is that under-extrusion is a symptom, not a single problem. A partially clogged nozzle can cause it. So can a slipping extruder, filament that is difficult to pull from the spool, excessive print speed, an unsuitable nozzle temperature, damaged PTFE tubing, or incorrect slicer settings.
Before increasing flow, work through the filament path and identify where the problem starts.
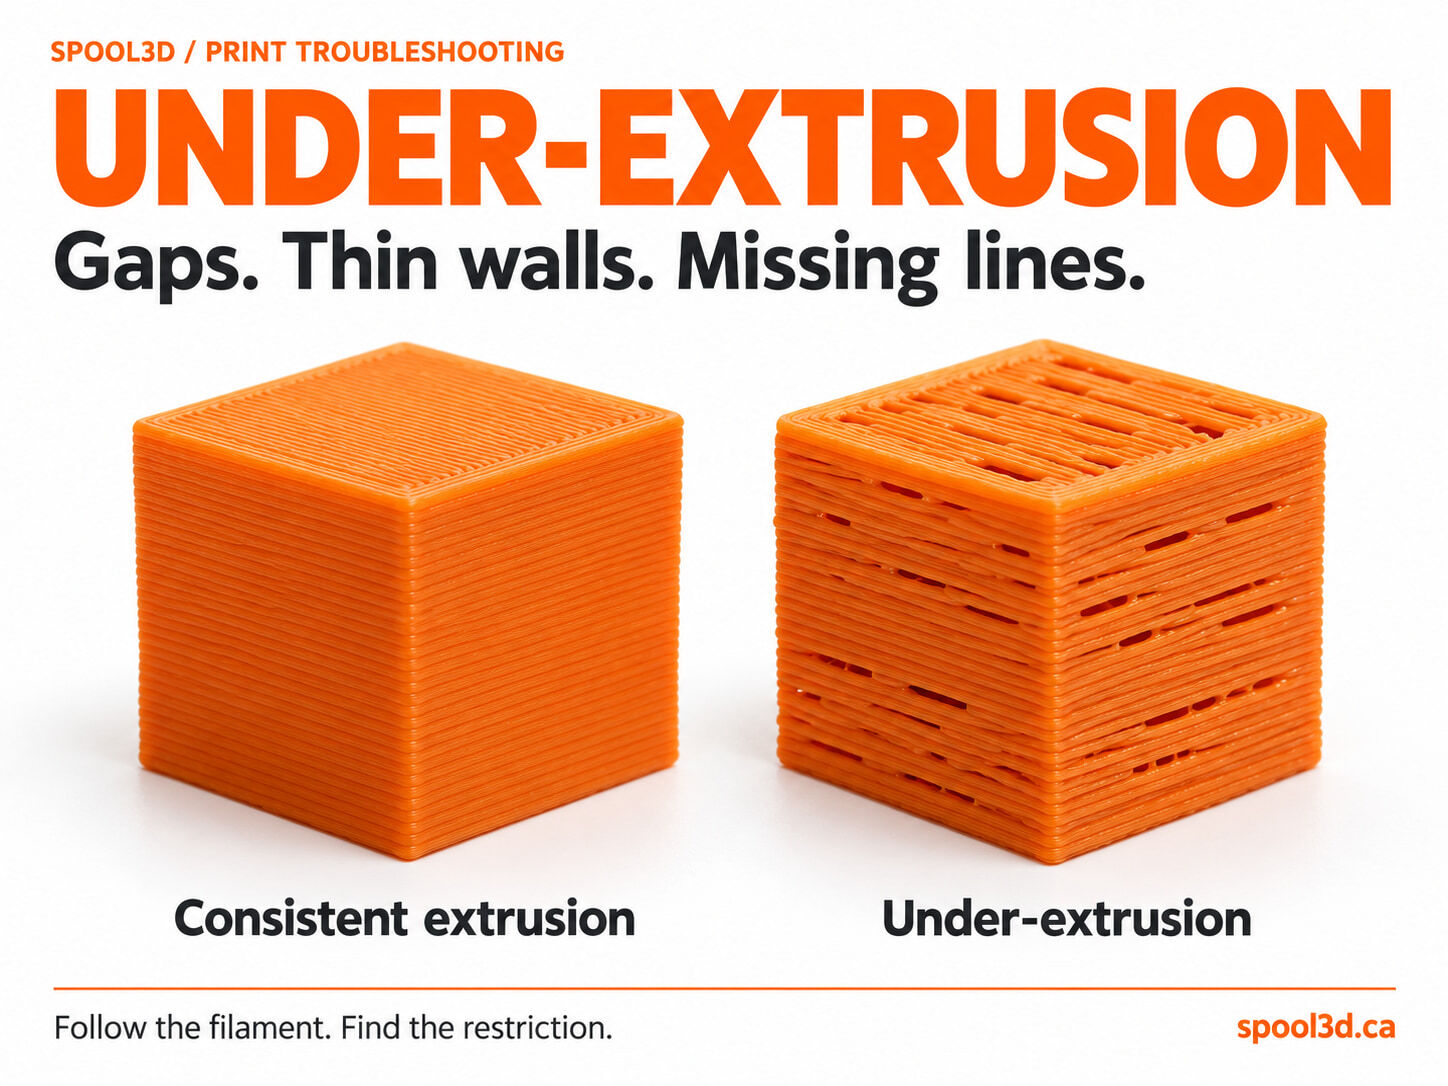
What does under-extrusion look like?
Common signs include:
- Gaps between perimeter lines.
- Infill that does not connect properly.
- Thin or incomplete walls.
- Missing sections of individual layers.
- Rough or inconsistently filled top surfaces.
- Layers that appear unusually transparent.
- Weak parts that separate along extrusion lines.
- Extrusion that periodically becomes thin and then returns to normal.
Severe under-extrusion can leave sections where almost no filament is deposited. Gaps alone do not prove the cause, though. Poor first-layer height, insufficient top layers and other settings can produce similar-looking defects.
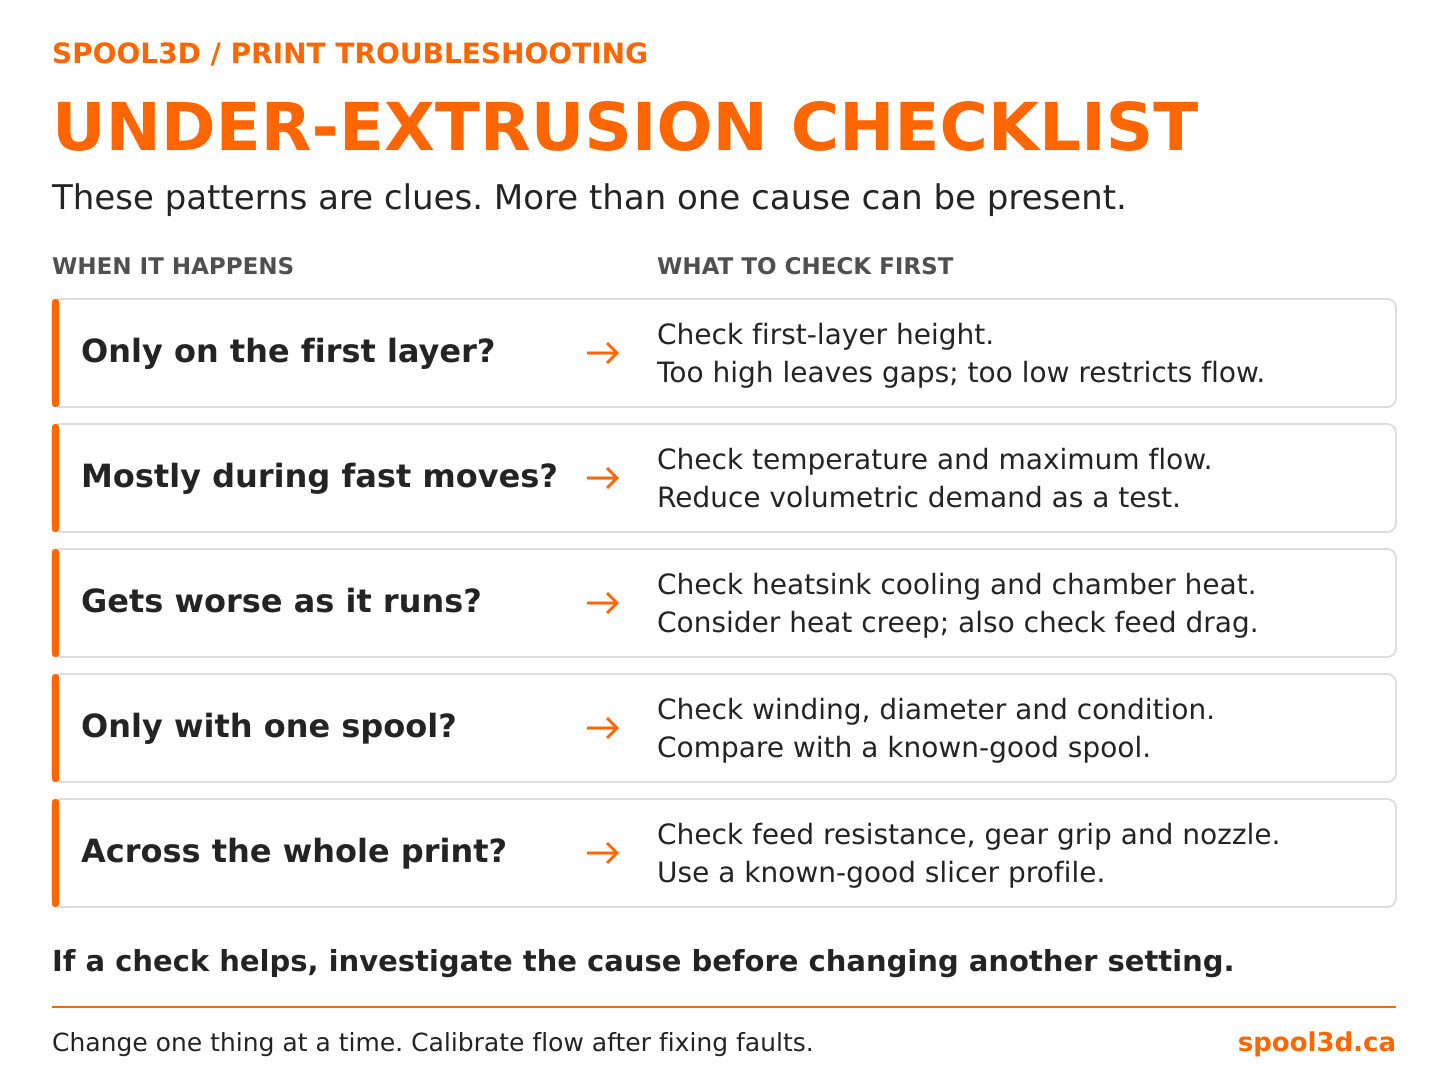
Before changing anything, note when it happens. Is the problem constant, limited to fast infill, confined to the first layer, or something that appears only after the printer has been running for a while?
1. Check the filament path first
Start with the simplest possibility: can the printer actually pull filament freely?
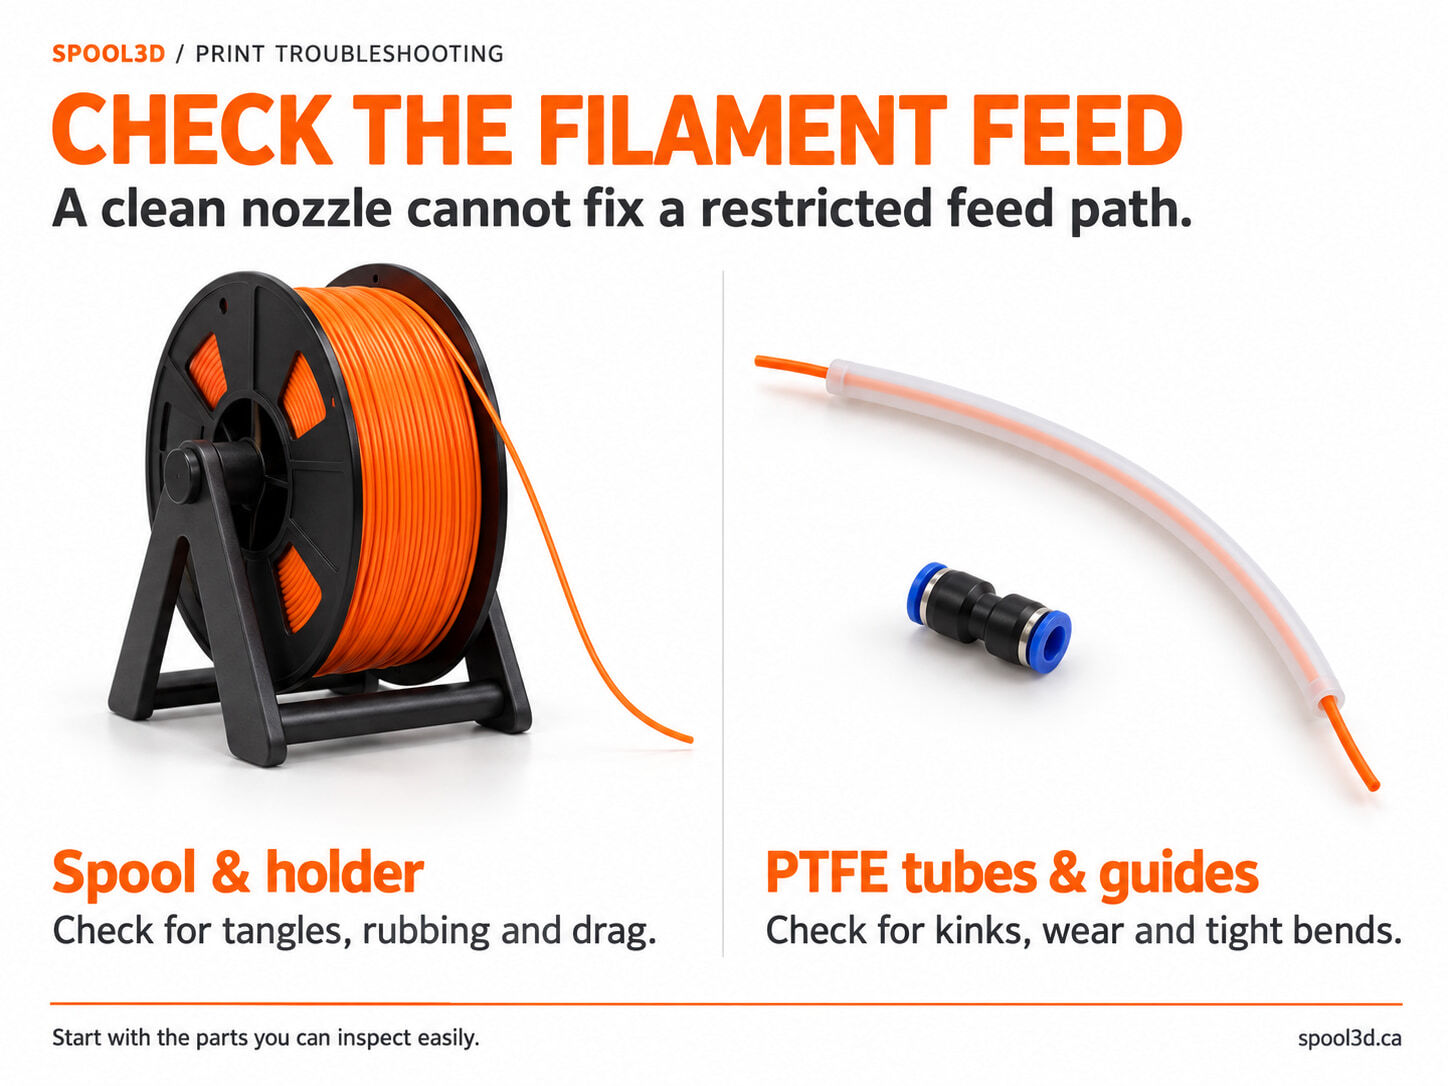
Watch the spool while the printer is running. The filament should unwind without excessive resistance. Look for:
- Crossed or tangled filament.
- A spool rubbing against its holder or enclosure.
- A holder that does not rotate freely.
- Filament catching on the edge of a spool.
- Tight PTFE bends or guides creating unnecessary drag.
- Feed resistance through an AMS or another multi-material system.
A printer can have a perfectly clean nozzle and still under-extrude if the extruder has to fight the spool. This is especially worth checking with large or heavy spools, damaged cardboard spool edges and long reverse-Bowden tubes.
2. Listen to the extruder
An extruder that cannot move the requested amount of filament will often give you an audible warning. Repeated clicking or skipping during extrusion can mean the system is encountering more resistance than it can overcome.
That resistance might come from a nozzle restriction, printing too cold, excessive volumetric flow, heat creep, a restricted filament path, or incorrect extruder tension.
If the extruder is clicking, increasing flow is usually the wrong response. The printer is already struggling to deliver the requested material. Asking it to extrude more can make the problem worse.
For a closer look at those symptoms, see 3D Printer Extruder Clicking or Skipping? Causes & Fixes.
3. Check for a partial nozzle clog
Not every clogged nozzle stops extrusion completely. A partial clog may still allow filament through, just not reliably or at the expected rate.
This can produce thin extrusion, uneven line width, intermittent gaps, weak walls, poor top surfaces and skipping at higher speeds. Possible causes include degraded material, foreign debris, burnt residue or remnants of another filament.
Using the printer's extrusion control, try a slow purge at an appropriate temperature for the loaded material. Keep clear of the hot nozzle and moving parts. The filament should exit reasonably smoothly and consistently.
A curl as the filament leaves the nozzle does not automatically prove that it is clogged. Erratic or unusually restricted extrusion is worth investigating, but a smooth slow purge also does not rule out a problem that appears at higher flow or after the hotend warms up.
Follow the manufacturer's cleaning procedure for the specific hotend. If cleaning does not restore reliable extrusion, inspect or replace the nozzle as appropriate for that design. Spool3D carries 3D printer nozzles in a range of printer-specific sizes and materials.
4. Make sure the nozzle temperature is appropriate
Filament becomes harder to push through the nozzle when it is printed too cold. At slow speeds, the printer may appear normal. As the extrusion rate increases, however, the hotend may struggle to melt the filament quickly enough.
The symptoms can resemble a clog: clicking, thin lines, missing extrusion and weak layer bonding. Problems may appear mainly during fast infill or long straight sections.
Confirm that the selected material profile matches the filament. If needed, test a modest temperature increase while staying within the filament manufacturer's recommendations and the hotend's temperature limits.
The temperature on a spool is a starting point, not a guarantee for every printer and speed. A higher-flow setup may need a different temperature, but simply raising the temperature indefinitely is not a solution. Reducing the requested flow may be the more appropriate adjustment.
5. Your printer may be exceeding the hotend's flow capacity
Modern 3D printers can move quickly. That does not mean every hotend and every filament can melt plastic quickly enough to maintain those speeds.
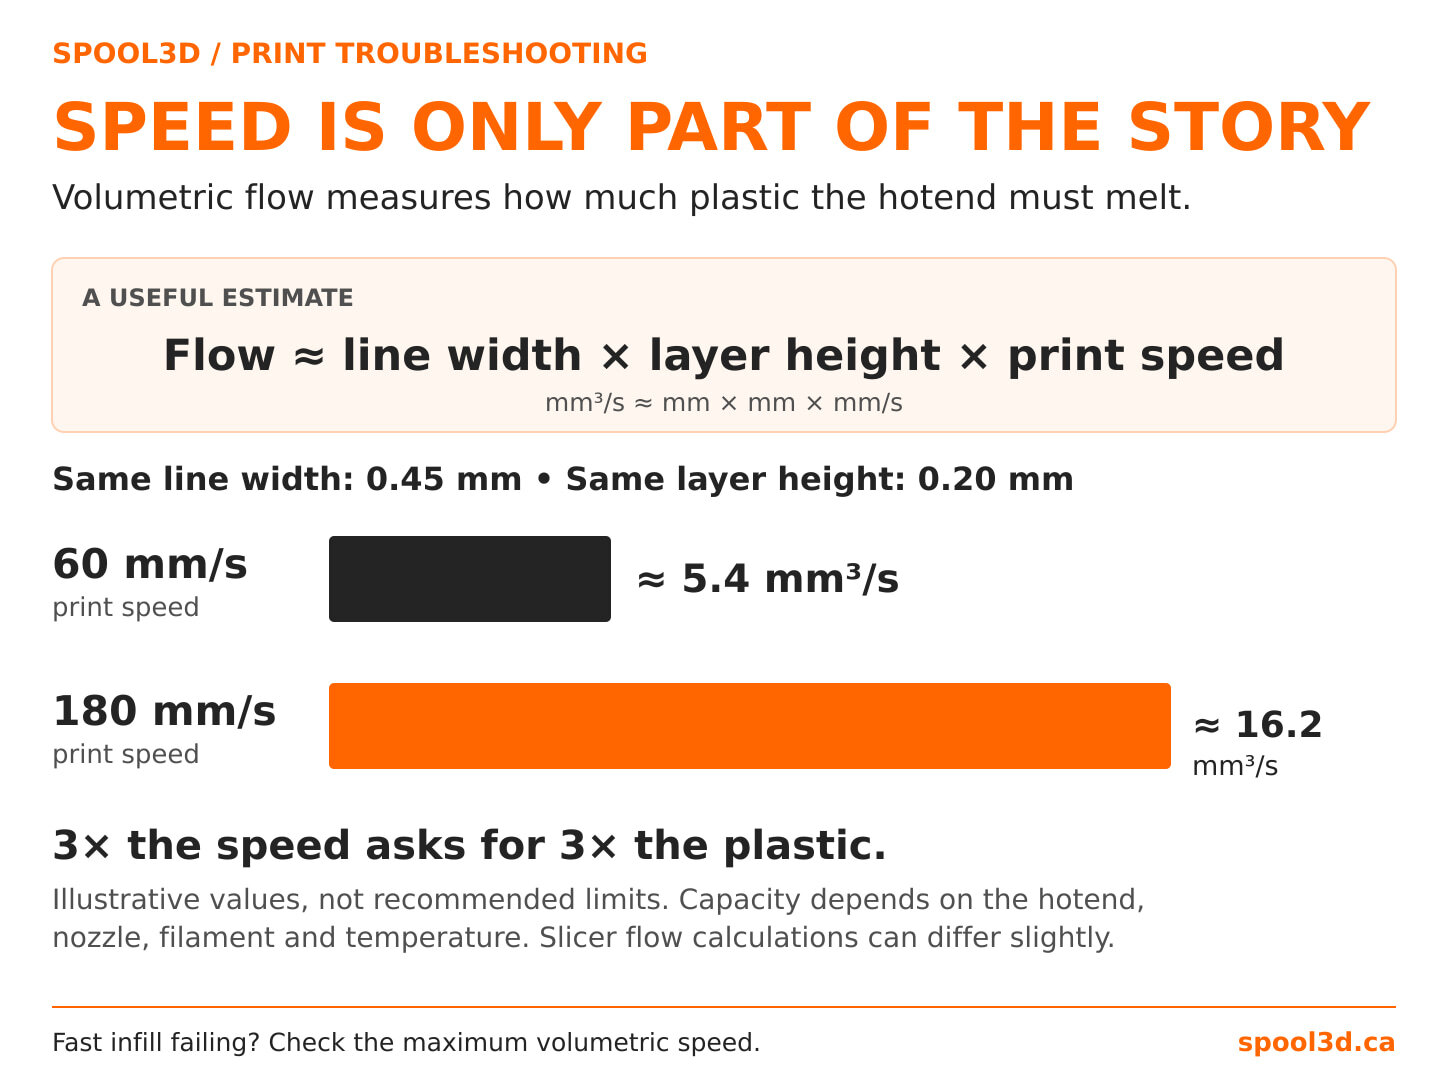
The useful measurement is volumetric flow: the volume of plastic extruded per second, usually expressed in cubic millimetres per second (mm3/s).
A combination of high print speed, large layer height and wide extrusion lines can ask for more material than the hotend can deliver. A larger nozzle often goes along with those wider lines and thicker layers.
A useful estimate:
Volumetric flow ≈ line width × layer height × print speed
0.45 mm × 0.20 mm × 60 mm/s ≈ 5.4 mm3/s
0.45 mm × 0.20 mm × 180 mm/s ≈ 16.2 mm3/s
The speed tripled, so the estimated demand tripled. These are illustrative values, not recommended flow limits. Slicers may calculate a slightly different volume from the shape of the extrusion line.
If slower outer walls look correct while fast infill under-extrudes, check the filament profile's maximum volumetric speed. Reducing that limit can constrain the demanding portions of the print without unnecessarily slowing every movement.
Improvement at lower flow is a useful clue, but it does not prove that the hotend is healthy. A partial clog, unsuitable temperature or worn feed components can also reduce its practical capacity.
6. Check the extruder drive gears
Extruder gears need enough grip to move filament consistently. Small, regular tooth marks can be normal. Ground-away sections, plastic powder and heavily flattened filament suggest that something needs attention.
Following the printer's maintenance procedure, inspect for:
- Filament debris packed into the drive gear teeth.
- Worn or damaged teeth.
- Incorrect idler tension.
- A loose or misaligned drive gear.
- A damaged idler or bearing.
- Filament that has been flattened or ground away.
Both too little and too much tension can cause feeding problems. Use the manufacturer's adjustment procedure instead of tightening the tensioner as far as it will go.
Cleaning the extruder is particularly useful after a serious jam. Ground filament can remain packed into the teeth and reduce grip even after the original blockage has been cleared.
7. Inspect PTFE tubes and connectors
PTFE tubing should guide filament without excessive drag. Problems can occur when a tube is kinked, crushed, cut poorly, damaged internally, not fully seated, or routed through an unnecessarily tight bend.
On designs where PTFE reaches close to the hot zone, heat damage can distort the tube and restrict movement. The tube's position and replacement procedure depend on the printer.
After unloading filament and disconnecting an accessible guide tube according to the manufacturer's instructions, pass a clean piece of filament through the tube by hand. It should move without pronounced tight spots. This checks the tube itself; do not try to force filament through a cold hotend.
Inspect connectors for damage and make sure replacement tubing is the correct size and length. Spool3D carries PTFE tubing and filament-path fittings for many printer configurations.
8. Consider heat creep
Heat creep occurs when heat travels farther up the hotend than intended and softens filament before it reaches the intended melt zone. The softened filament can deform and create additional friction or a jam.
The resulting under-extrusion often becomes worse as the print continues. Clues include:
- Printing normally at first, then developing gaps later.
- Clicking after the printer has been running for a while.
- A swollen section of filament after unloading.
- Problems occurring more frequently with PLA.
- Failures that become more common in a warm enclosure.
If the printer works again after cooling down, heat creep deserves consideration, although that alone does not confirm it. Check the heatsink cooling fan, airflow, enclosure conditions and hotend assembly.
The fan that cools the printed part is not necessarily the fan that cools the heatsink. Increasing part cooling may do little for a fault in the hotend's cold-side cooling system.
Our article Why PLA and PETG Jam in Enclosed 3D Printers covers the enclosure and cooling checks in more detail.
9. Check filament diameter and condition
Filament is worth considering when an extrusion problem follows one particular spool. Diameter variation, contamination, brittle sections, excessive moisture, irregular surface texture and poor winding can all interfere with reliable printing.
Wet filament does not always cause traditional under-extrusion. Moisture can also cause popping, bubbles and rough surfaces that resemble other extrusion faults. Dry the material using the filament manufacturer's guidance if moisture is suspected.
Try a known-good spool of the same material with an appropriate profile. That comparison is often more useful than changing half a dozen printer settings at once.
10. Check the slicer before increasing flow
Confirm the basic profile selections early, particularly if the problem began after a nozzle, filament or preset change. Before fine-tuning flow, check:
- The correct printer and installed nozzle diameter.
- The correct material profile and filament diameter.
- Maximum volumetric speed.
- Extrusion multiplier or flow ratio.
- Line width and layer height.
- Nozzle temperature.
A nozzle-size mismatch can leave the printer using unsuitable line widths, layer heights and speed assumptions. If you have been experimenting with profiles, a known-good preset provides a useful baseline.
A flow-ratio adjustment can compensate for small, repeatable material-specific differences. It should not be used to hide a clogged nozzle, slipping extruder or restricted feed path.
If a printer that previously worked correctly suddenly needs a major flow increase, find out what changed.
11. Do not confuse under-extrusion with poor first-layer calibration
If the problem appears only on the first layer, the printer may not have a general flow problem. A nozzle that is too far from the build plate leaves individual extrusion lines separated instead of joining them into a continuous surface.
Typical clues are:
- The rest of the print looks normal.
- Gaps occur only on the first layer.
- Individual lines look rounded instead of slightly flattened.
- First-layer adhesion is also poor.
The opposite error can cause trouble too: a nozzle pressed too close to the plate can restrict extrusion and trigger clicking. Check bed cleanliness, levelling and the first-layer calibration procedure for your printer before compensating with flow.
A useful troubleshooting order
First confirm the nozzle, material and temperature selections. Then use a repeatable test and change one variable at a time:
- Make sure the spool feeds freely. Check the holder, winding and external guides.
- Note when the problem happens. Listen for clicking or slipping.
- Inspect the extruder gears. Look for debris, wear and incorrect tension.
- Check for a partial clog. Use the printer's purge control and follow its cleaning procedure.
- Confirm the nozzle temperature. Match the material and requested extrusion rate.
- Inspect PTFE tubing and fittings. Check for damage, tight bends and excessive resistance.
- Reduce maximum volumetric speed if the fault occurs mainly at high speed.
- Consider heat creep if it worsens during longer prints.
- Compare with a known-good spool.
- Calibrate flow once feeding is reliable.
Why increasing flow often is not the solution
It is tempting to see gaps and immediately increase flow. That can help when the extrusion multiplier genuinely needs calibration, but it cannot remove a physical restriction.
If a nozzle is partially clogged, increasing flow asks the extruder to push more material against the same restriction. If the hotend has already reached its practical melting capacity, a higher flow ratio increases the demand again.
Flow calibration corrects small, repeatable extrusion differences. It does not repair a feeding fault.
Follow the filament
Start at the spool and trace the actual route through your printer: its guides and tubes, extruder, hotend and nozzle. Bowden and direct-drive printers place those components differently, so use your machine's layout rather than assuming every filament path is identical.
Check the mechanical path alongside the material profile, temperature and requested volumetric flow. Changing one variable at a time makes it easier to identify the real cause and return to reliable settings.
Spool3D carries replacement nozzles and PTFE tubing and fittings. If the cause remains unclear, our 3D printer repair service in Calgary can help diagnose supported machines.
Technical references: Prusa: under-extrusion and Prusa: maximum volumetric speed. Maintenance and calibration steps vary by printer; use the procedure for your model.
Recent Posts
-
3D Printer Under-Extrusion: Causes, Fixes & Troubleshooting
Under-extrusion happens when your 3D printer deposits less plastic than the slicer expects. The res …October 06, 2026 -
3D Printer Layer Shifts: Belt Problem, Pulley Problem, Collision — or Something Else?
A layer shift can ruin an otherwise perfect print in a fraction of a second. The printer may run no …October 01, 2026 -
3D Printer Stringing: Why Retraction Isn’t Always the Answer
Stringing is one of those 3D printing problems that gets reduced to a single piece of advice: “Incr …September 29, 2026