
3D Printer Layer Shifts: Belt Problem, Pulley Problem, Collision — or Something Else?
A layer shift can ruin an otherwise perfect print in a fraction of a second.
The printer may run normally for hours, make one bad movement, and then continue printing every remaining layer several millimetres away from where it belongs.
That sudden offset is the clue.
A true layer shift usually means the printer lost its expected X or Y position. The controller still thinks the toolhead or bed is where it should be, but the physical motion system slipped, skipped steps, hit something, or failed to complete a commanded move.
That is why restarting the print without finding the cause often produces the same expensive failure again.
First: make sure it is actually a layer shift
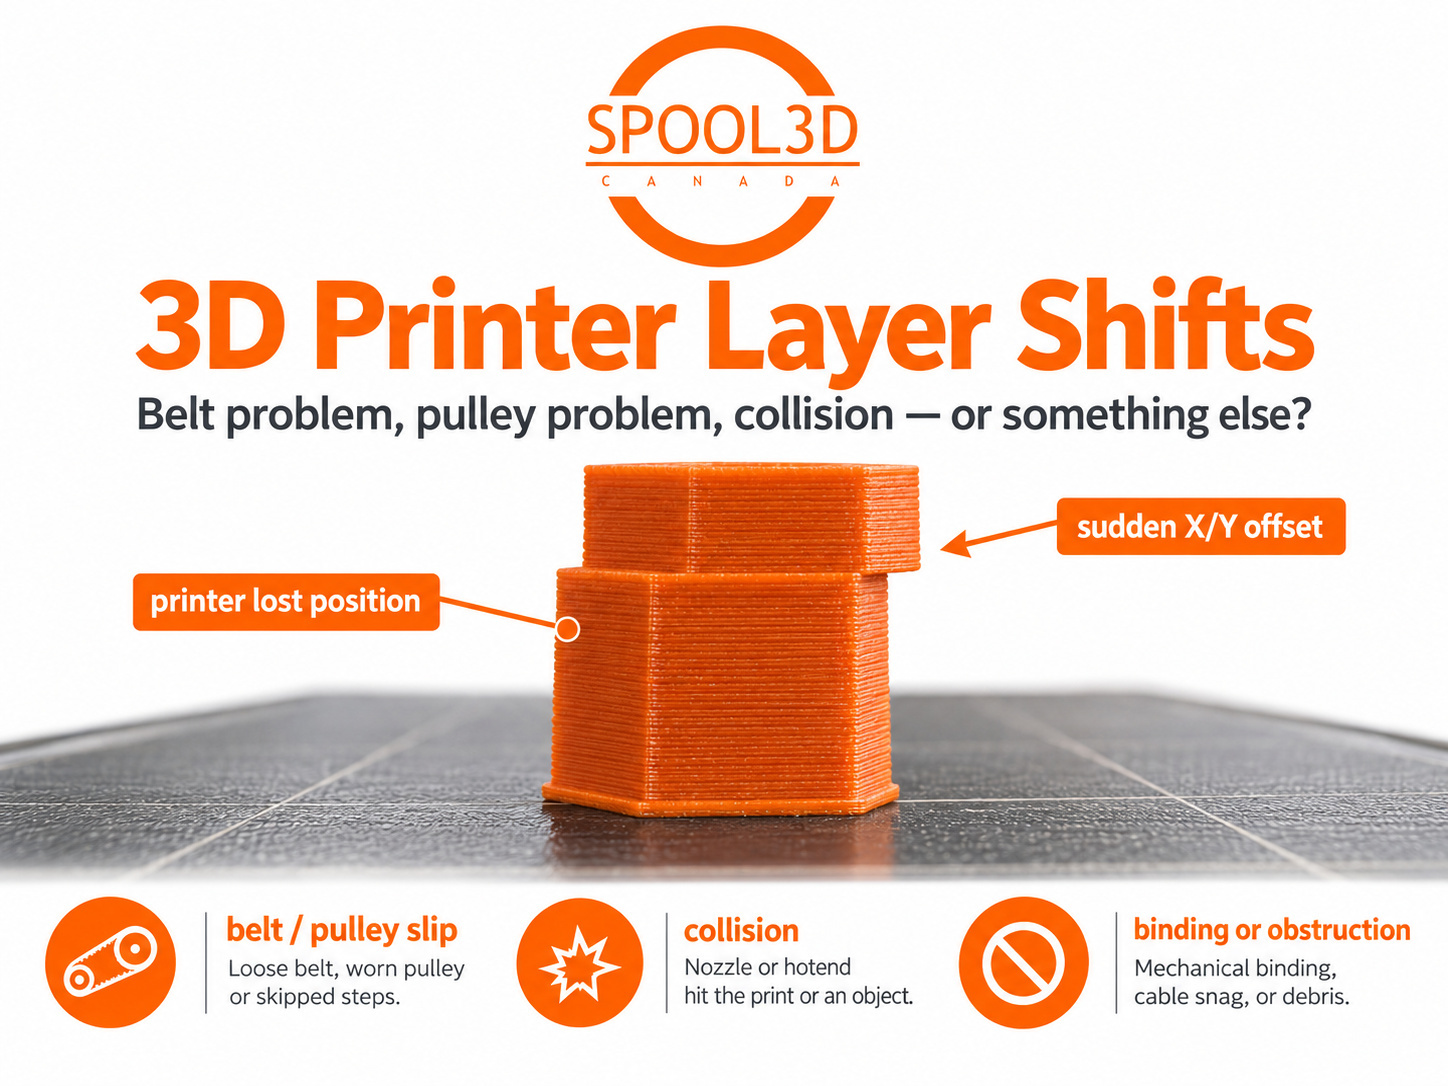
A real layer shift normally looks like a clean horizontal offset. Everything below a certain height is in one position, then one layer moves sideways and the printer continues from the new position.
That is different from:
- Z wobble or repeating vertical bands, where the walls move in and out gradually.
- Warping, where corners or edges lift rather than the entire XY position changing.
- Loose layers or poor adhesion, where part of the model moves but the printer itself has not lost position.
- Leaning or skewed geometry, which can indicate frame or axis alignment problems rather than one sudden skipped movement.
If a corner is curling upward and the nozzle eventually hits it, warping may be the event that causes the later layer shift. Our article 3D Print Warping After a Good First Layer? Causes & Fixes covers that part of the problem in more detail.
1. Identify which direction the print shifted
Before touching a belt tensioner, look at the failed part.
Did the upper portion move left/right, front/back, or diagonally?
On a conventional Cartesian or bed-slinger printer, that can point fairly directly toward the X or Y motion system.
On a CoreXY printer, the diagnosis is less direct because both XY motors and belts work together to create X and Y movement. A shift that appears to be purely in X does not automatically mean there is one dedicated “X belt” to tighten.
Either way, knowing the direction helps you reproduce the motion by hand and inspect the relevant belt paths, idlers, rails and pulleys.
2. Check whether the nozzle hit the print
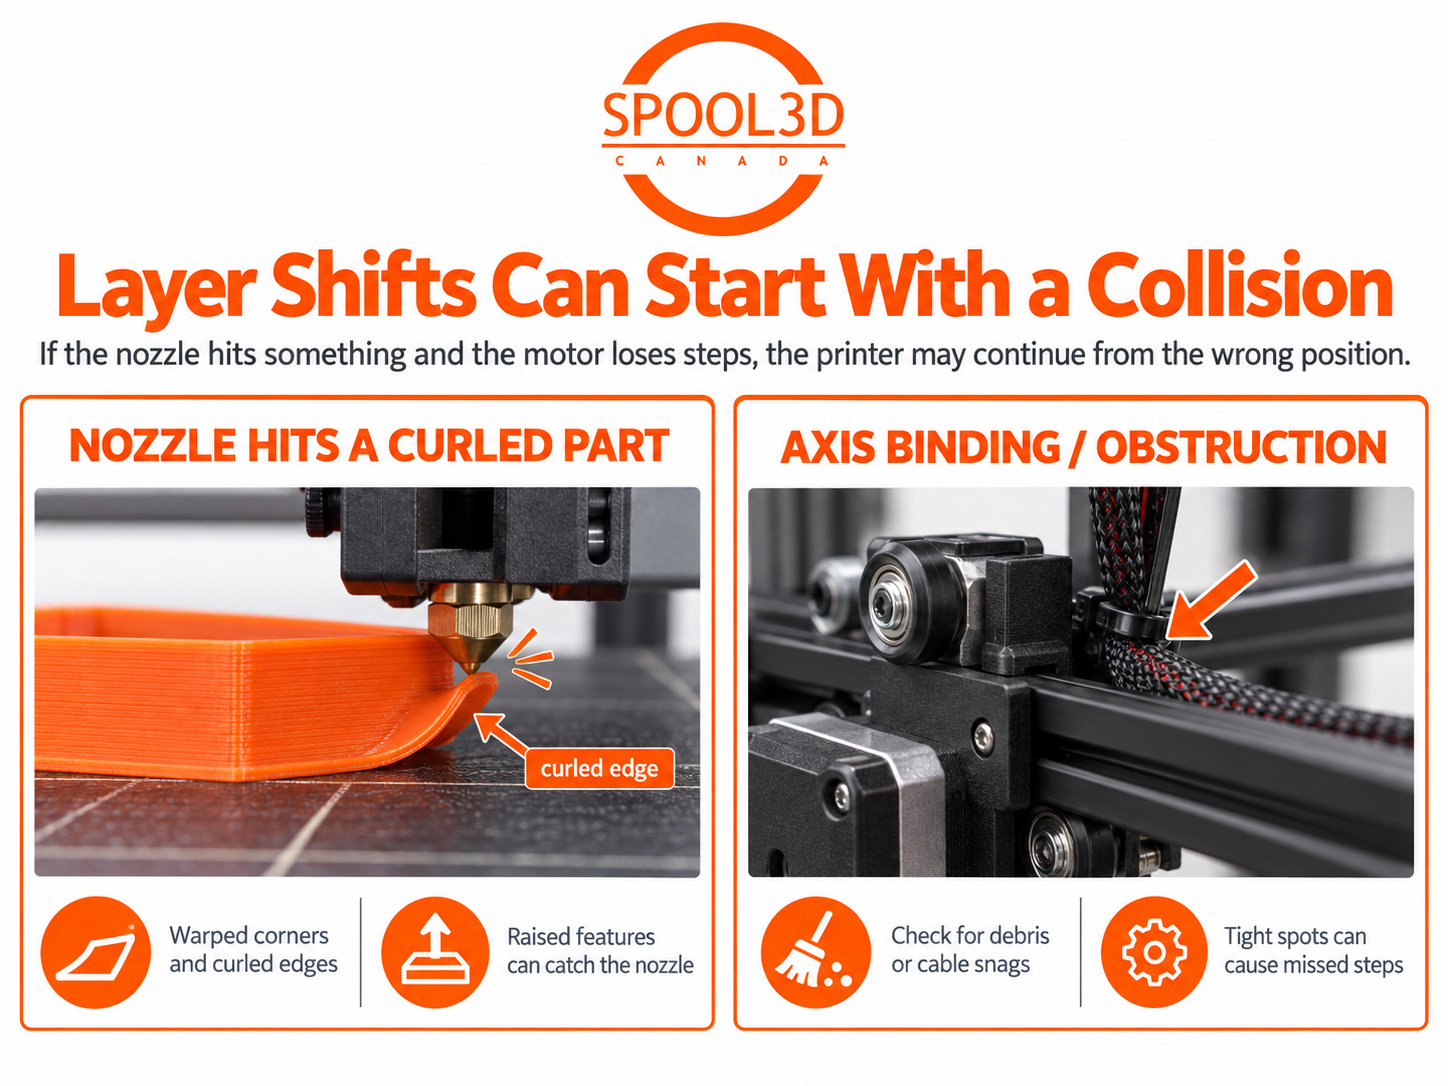
One of the easiest layer-shift causes to miss is a perfectly healthy motion system that crashed into the model.
The toolhead moves, the nozzle catches a raised feature, and the stepper motor cannot complete the commanded motion. If the printer does not detect and recover from that event, every layer afterward can be offset.
Look for:
- A warped corner sticking upward.
- An overhang that curled toward the nozzle.
- A blob or piece of filament on the surface.
- Infill standing above the surrounding walls.
- A support that broke loose.
- A model that detached slightly and moved.
If the shift happens after the printer makes an audible bang, scrape or knock, do not start by tightening the belts. Find out what the nozzle hit.
3. Move the axes by hand before adjusting anything
With the printer powered off — and only if the manufacturer allows the axes to be moved manually — move the affected axis slowly through its full range.
You are looking for consistency.
The motion should not be smooth for 90% of the travel and suddenly tight in one location.
Check for:
- Filament scraps or debris around pulleys and rails.
- Cables or PTFE tubes becoming tight at the end of travel.
- A drag chain or wiring harness catching the frame.
- Damaged wheels, bearings or linear guides.
- Misaligned rails.
- A belt rubbing against a flange or printed/plastic part.
Maintenance is printer-specific. Do not put grease on every rail or bearing you see. Some motion systems are intended to run with a specific lubricant, while others use self-lubricating or dry-running components. Follow the printer manufacturer's maintenance procedure.
If a linear rail or bearing really is damaged, Spool3D carries linear guides, bearings and other motion-system parts.
4. Belt tension matters — but “tighter” is not the goal
Loose belts are a common cause of layer shifts, but simply tightening every belt as much as possible is not good troubleshooting.
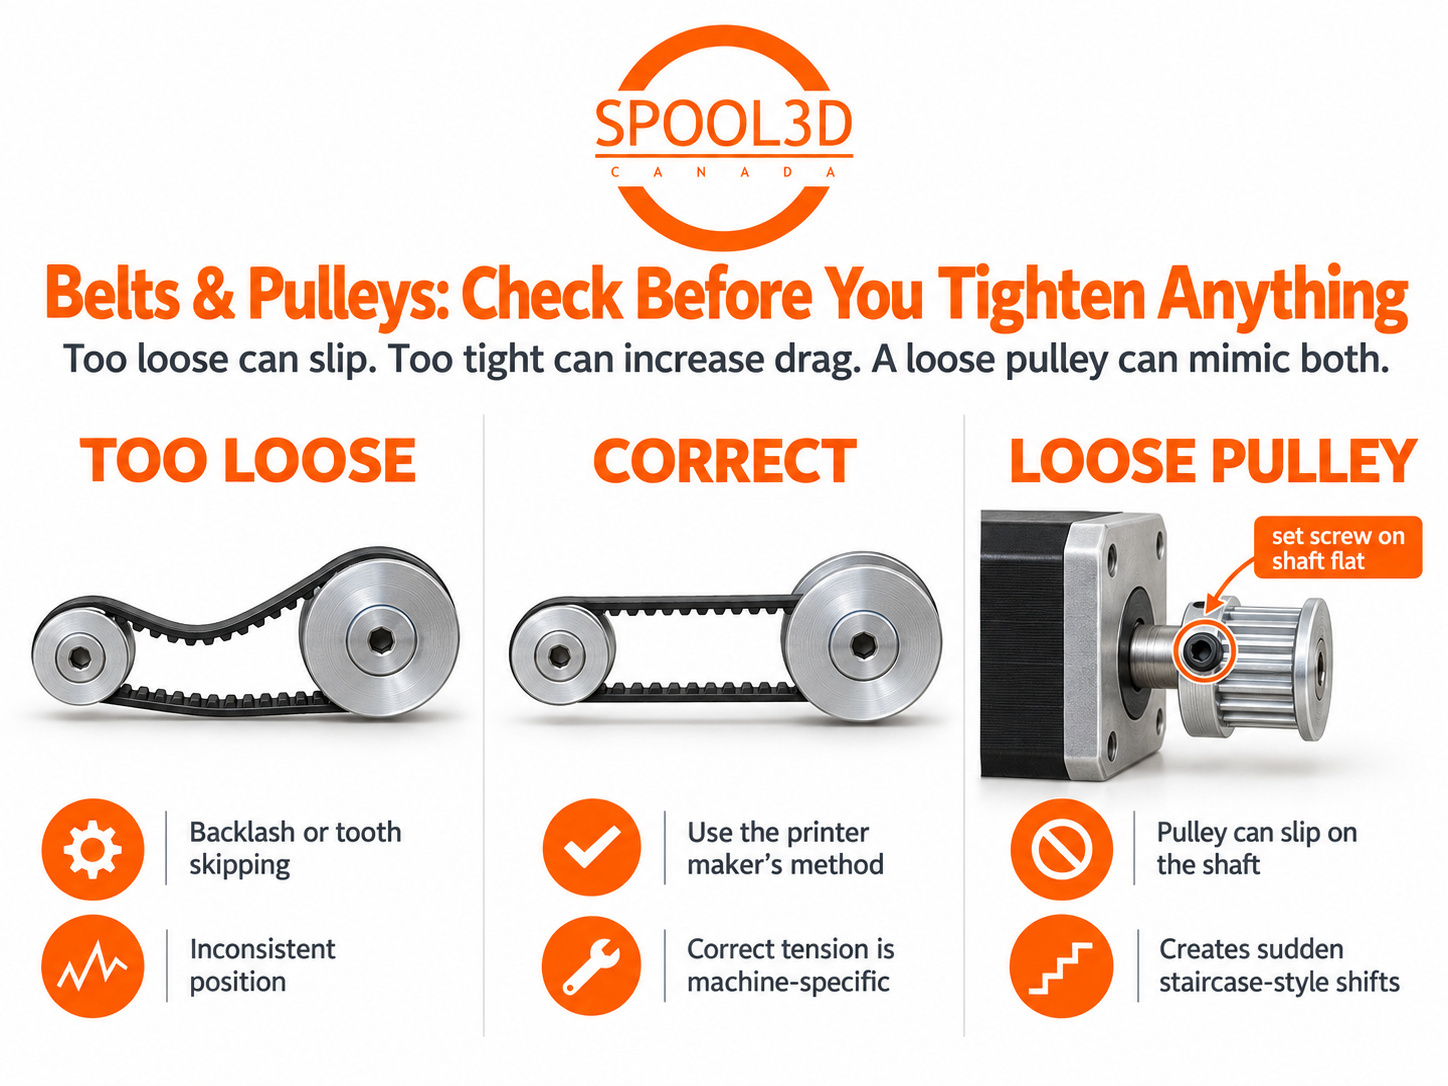
A belt that is too loose can introduce backlash, skip teeth or allow the carriage to move without the motor producing the expected position.
A belt that is excessively tight can increase bearing load, motor load and friction. On some CoreXY machines it can also make the gantry harder to square and move smoothly.
Use the manufacturer's belt-tension procedure for the actual printer.
Prusa's current layer-shift guidance lists incorrect belt tension and insecure pulleys among the most common causes, and its XL guidance explicitly notes that both loose and over-tightened belts can create motion problems.
Spool3D carries replacement 3D printer belts, idlers and pulleys, but replace parts only after confirming they are actually worn or damaged.
5. Inspect every motor pulley and idler
A belt can be perfectly tensioned and the printer can still shift if the pulley itself slips on the motor shaft.
Many 3D printer motor pulleys use one or more set screws. On designs with a flat on the motor shaft, one set screw is normally intended to clamp against that flat.
If the screw loosens, the shaft can rotate without moving the pulley exactly the same amount.
That often creates a distinctive staircase-style failure: the printer moves correctly until the pulley slips, then the print continues at a new offset.
Also inspect idlers for:
- Rough or seized bearings.
- Side-to-side movement.
- A belt climbing a pulley flange.
- Damaged belt teeth.
- Loose mounts.
6. Ask when the layer shift happens
The timing can narrow the problem quickly.
Random height, different every print:
Look closely at belt/pulley slip, intermittent binding, collisions, motor temperature or aggressive motion settings.
Exactly the same height every time:
Look for a repeatable nozzle collision, model feature, cable position, localized rail obstruction or toolpath problem. Re-slicing the model is also a worthwhile test.
Only on very fast prints:
Speed and acceleration become much more suspicious.
Only on large/tall prints:
Check whether the printer hits a mechanical tight spot, cables reach their limit, the part starts warping, or motors/drivers become very hot later in the job.
Only after a loud impact:
Treat the collision as the primary problem.
7. Speed is not the same thing as acceleration
A printer can advertise a very high maximum speed and still shift layers if the motion profile asks the motors to change velocity too aggressively.
Acceleration determines how quickly the printer tries to get from one speed to another. A fast travel move with moderate acceleration may be easier on the motion system than a shorter move with extremely aggressive acceleration.
If the hardware looks correct but shifts occur primarily during fast travel moves, reduce both speed and acceleration as a diagnostic test.
If the same file suddenly completes, you have learned something useful: the problem is connected to motion demand or collision behaviour.
That does not automatically mean the permanent solution is “print everything slowly.” The underlying issue may still be excessive belt drag, a loose pulley, a motor problem or a toolpath that causes collisions.
8. Do not ignore overhangs, infill and curled edges
A layer shift that appears to be a motion-system problem may actually begin with print quality.
For example:
- An ABS or ASA corner warps upward.
- The nozzle hits that raised corner during a travel move.
- The X/Y motor skips steps.
- The printer continues several millimetres out of position.
In that example, tightening the belt does not solve the cause.
Similarly, poorly supported overhangs, excessive material buildup, failed supports and raised infill can all create a physical obstacle.
Depending on the model and printer, better cooling, support, lower flow, different infill, a small Z-hop or fixing the warping itself may be more effective than changing the motion system.
9. A CoreXY printer needs slightly different thinking
On a traditional printer, it is easy to think in terms of “X belt” and “Y belt.”
CoreXY kinematics do not work that way.
Both motors contribute to X/Y movement through the belt paths. Belt tension also needs to be balanced well enough for the gantry to remain square and move consistently.
That means a layer shift on a modern CoreXY machine — including many current enclosed printers — should be diagnosed using that printer's specific belt-tension and gantry procedure rather than generic advice written for an older bed-slinger.
If you are unsure, use the manufacturer's service documentation before changing tensioners or pulley positions.
10. Electrical problems are possible, but check the mechanical system first
Stepper motors do not report their exact position on many printers. If the motor misses a step, the controller may have no way to know that the physical position changed.
Once you have ruled out belts, pulleys, collisions and axis resistance, electrical causes become more reasonable to investigate:
- A loose motor connector.
- A damaged motor cable.
- A stepper motor overheating or failing.
- A motor driver overheating or malfunctioning.
- A power-supply or controller problem.
Do not start adjusting stepper-driver current unless the printer manufacturer specifically provides a procedure for doing so. Modern printers often control current in firmware, and increasing it blindly can overheat the motor or driver.
Spool3D carries 3D printer stepper motors and other electronics, but diagnosis should come before parts replacement.
What about crash detection?
Some printers can detect a motor stall or collision and attempt to recover. Others cannot, and some only enable that feature in certain operating modes.
Crash detection is useful, but it should not be treated as permission to let the nozzle repeatedly hit the model.
If the printer reports frequent crashes, find the cause: warped geometry, excessive drag, belt issues or a motion problem may still be present even if the machine successfully recovers.
Our troubleshooting order for a layer shift
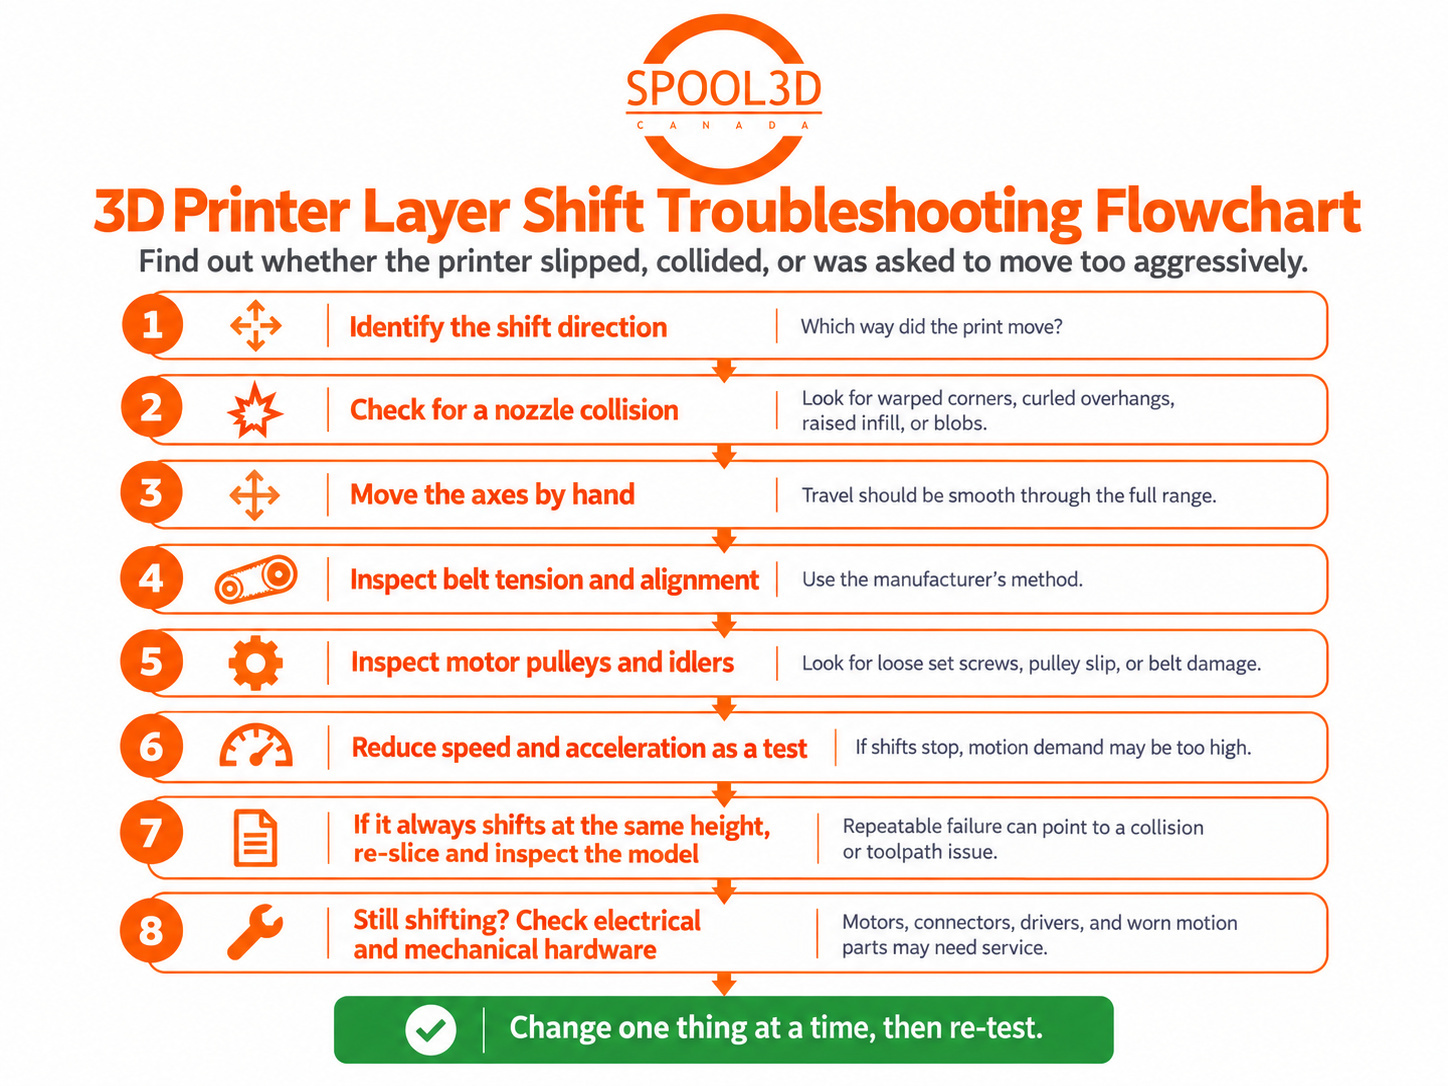
- Confirm that it is a true X/Y layer shift.
- Identify the direction and approximate height of the shift.
- Look for evidence that the nozzle hit the print.
- With the machine safely powered down, check the full axis travel for binding or obstructions.
- Check belt tension using the manufacturer's procedure.
- Inspect motor pulleys, set screws, idlers and belt alignment.
- Reduce speed and acceleration as a diagnostic test.
- If the failure repeats at exactly the same height, inspect the model/toolpath and re-slice.
- Only then move into motors, wiring, drivers and controller diagnostics.
Do not tighten the belts first and ask questions later
Layer shifting is a motion problem, but the belt is only one part of the motion system.
A loose pulley, a trapped piece of filament, a binding rail or a nozzle repeatedly hitting a warped corner can all produce a print that looks like “the belt slipped.”
The fastest way to fix the printer is to work through the motion chain in order and change one thing at a time.
Spool3D carries belts and pulleys, linear guides, bearings, stepper motors and other 3D printer replacement parts. If the motion system continues to lose position after the basic mechanical checks, our 3D printer repair service in Calgary can help diagnose supported machines.
Recent Posts
-
Fix Rough 3D Print Top Layers & Pillowing | Spool3D
The walls look good. The corners are clean. Then the printer reaches the top of the part and leave …October 14, 2026 -
3D Prints Splitting Between Layers? Causes & Fixes for Weak Layer Adhesion
A 3D print can have a smooth surface, tidy corners and a clean top layer, then split the first time …October 08, 2026 -
3D Printer Under-Extrusion: Causes, Fixes & Troubleshooting
Under-extrusion happens when your 3D printer deposits less plastic than the slicer expects. The res …October 06, 2026