Description
Free shipping in Canada for orders over $140 before tax. (via Canada Post)
Sprite extruder from Creality
- Large torque
- Adjustable Tension
- Compact Size
- Dual Geared
- Efficient Heat Dissipation
- All-metal Design*
- 300℃ High Temperature Printing*
*Sprite Extruder Pro Model Only
What's included:
- 1 assembled Sprite Extruder of chosen type
- If upgrade kit is chosen, includes required cables, screws, extra nozzle, extruder mount plate with wheels
Buy a Creality Sprite Extruder for your Creality 3D printer from Spool3D online in Canada without the surprise cost of the exchange rate!
Videos
View AllClose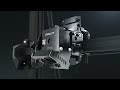
4 Reviews
-
Creality Sprite Extruder
By far the easiest extruder upgrade I have ever installed. I have tried many other brand name and off-brand extruder replacements for the stock model and aside from having to adjust the z-axis end stop and the steps/mm, as you should for any extruder part replacement, it has run flawlessly on the last 10 large bed projects on my CR-10s. The printer itself needed a small modifcation to allow for mounting bolts/nuts clearance but the operation of the extruder is amazing. Going to see about adapting my Ender 6 to take one of these as well. I cannot recommend the Sprite extruder highly enough for anyone running a Creality or similarly configured machine.
-
Excellent product
I love this direct drive upgrade for my ender 3 v2 So far I printed with TPU,PETG, ABS, Nylone and Polycarbonate filaments on it without any problems,
-
Creality Sprite Pro on my Ender 5
Installed on my Ender 5 original series Modified with a MKS Gen L board from SPOOL3D . Had to do some modifications. Moved X axis end stop which required drilling and tapping a new mounting hole.(You could probably just use a T nut and shorter screw). Wiring was a case of swapping out the connections with stock set up. The hot end and carriage fits on the X extrusion almost like the original, but you have to add a 3d printed part ( https://www.thingiverse.com/thing:5405408). This will allow you to attach the drive belt. Many thanks to " ghestrada" for his remix. I have been using the Petg part with out any problem but may make a metal copy just for insurance. The biggest mod I made was to remove the top front extrusion and its corner brackets. Before removing said bracket I carefully measured the distance between the upright extrusions it was attached to. On my machine it was 330 mm. I then shortened the removed extrusion by cutting one end to make it match 330 mm. I then drilled and tapped the cut end to fit the corner bracket so it matched the other end. This it allowed me to fit the extrusion and corner brackets between the front upright extrusions, using T nuts on the Brackets. This maintains the the frame alignment and allows the Y axis to move all the way to the front. By using T nuts I can move the assembly up or down to suit best position. With out moving the Top front extrusion the Part Fan on the Sprite Extruder would hit and limit the Y axis travel. This mod makes the print bed much more accessible as well. A win win for sure. All you would have to change in software would be the steps for the extruder, boost up the max temperature for the hot end. I adjusted the Y travel to get Max travel to the front for extruder maintenance. I am just starting with Klipper so still in experimental stage. Klipper and this extruder gets the most out of this printer for sure.
-
Creality Sprite Pro
Installed on my Ender 5 original series Modified with a MKS Gen L board from SPOOL3D . Had to do some modifications. Moved X axis end stop which required drilling and tapping a new mounting hole.(You could probably just use a T nut and shorter screw). Wiring was a case of swapping out the connections with stock set up. The hot end and carriage fits on the X extrusion almost like the original, but you have to add a 3d printed part ( https://www.thingiverse.com/thing:5405408). This will allow you to attach the drive belt. Many thanks to " ghestrada" for his remix. I have been using the Petg part with out any problem but may make a metal copy just for insurance. The biggest mod I made was to remove the top front extrusion and its corner brackets. Before removing said bracket I carefully measured the distance between the upright extrusions it was attached to. On my machine it was 330 mm. I then shortened the removed extrusion by cutting one end to make it match 330 mm. I then drilled and tapped the cut end to fit the corner bracket so it matched the other end. This it allowed me to fit the extrusion and corner brackets between the front upright extrusions, using T nuts on the Brackets. This maintains the the frame alignment and allows the Y axis to move all the way to the front. By using T nuts I can move the assembly up or down to suit best position. With out moving the Top front extrusion the Part Fan on the Sprite Extruder would hit and limit the Y axis travel. This mod makes the print bed much more accessible as well. A win win for sure. All you would have to change in software would be the steps for the extruder, boost up the max temperature for the hot end. I adjusted the Y travel to get Max travel to the front for extruder maintenance. I am just starting with Klipper so still in experimental stage. Klipper and this extruder gets the most out of this printer for sure.
Related Products
Related Products
Creality Sprite Extruder SE Upgrade
Creality
Creality Circuit Board for Sprite Extruder
Creality
Creality Ribbon Cable for Sprite Extruder
Creality

Creality Sprite Extruder Kit - Plastic Parts
Creality
Creality Sprite Extruder SE-NEO Upgrade
Creality